参考文章
闪烁之狐的博客
- https://blinkfox.github.io/
- https://github.com/blinkfox/hexo-theme-matery
- https://blinkfox.github.io/2018/09/28/qian-duan/hexo-bo-ke-zhu-ti-zhi-hexo-theme-matery-de-jie-shao/#toc-heading-24
洪卫博客
- https://sunhwee.com/
- https://github.com/shw2018/hexo-blog-fly/
- https://sunhwee.com/posts/6e8839eb.html#toc-heading-22
Hexo官网
Hexo搭建教程
问题总结
把主页的中文名换名字
进入主题目录/themes/hexo-theme-matery/,打开_config.yml文件,修改为

/MyBlog/themes/hexo-theme-matery-develop/languages/中,可以改变英文和中文的映射。
添加新菜单并实现新菜单的文章归类
https://www.cnblogs.com/codebook/p/10312965.html
1.添加收藏夹菜单,新建一个页面,命名为 favorite,命令如下:
hexo new page favorite
然后
然后就可以看到在source下多了一个favorite的文件夹,里面有一个index.md文件
2.在菜单中添加链接。编辑主题的 _config.yml ,在 menu 中添加如下代码:
- page: favorite
    directory: favorite/
    icon: fa-star
3. 如果你用的时中文,即你使用的语言是 zh-CN,那么你就需要在themes主题下找到你安装的主题里找到languages文件夹,里面有个zh-CN.yml,
用编辑器打开这个文件,添加favorite对应的中文翻译
favorite: 收藏夹大功告成!!此时你已经有了一个新的菜单favorite,你可以到source目录下面找到一个favorite文件夹里面有个index.md,你可以按需修改这个index.md文件。
4.如何将文章归类到这个新建的菜单下面呢?
如果你想在这个新建的菜单favorite下面实现文章的归类,而不是只显示单一的index.md中的内容,那么你需要做以下修改:
4.1 回到第2步,编辑主题下的_config.yml, 找到menu将新添加的菜单favorite修改为:
// 不做文章归类新建菜单 favorite
- page: favorite
    directory: favorite/
    icon: fa-star

// 做文章归类新建菜单 favorite
  - page: favorite
    directory: categories/favorite
    icon: fa-star
4.2 在写文章时,头部增加一个favorite分类就行了。
// 注意格式,不同的主题书写格式稍有差异
---
title: abc
categories:
- favorite
tags:
---
写文章
1. post
当你每一次使用代码
hexo new XXX它其实默认使用的是post这个布局,也就是在source文件夹下的_post里面。
Hexo有三种默认布局:post、page和draft,
它们分别对应不同的路径,而您自定义的其他布局和post相同,都将储存到source/_posts文件夹。
而new这个命令其实是:
hexo new [layout] <title>只不过这个layout默认是post罢了。
2. draft
draft是草稿的意思,也就是你如果想写文章,又不希望被看到,那么可以
hexo new draft newdraft这样会在source/_drafts中新建一个newdraft.md文件,如果你的草稿文件写的过程中,想要预览一下,那么可以使用
hexo server --draft在本地端口中开启服务预览。
如果你的草稿文件写完了,想要发表到post中,
hexo publish draft newdraft就会自动把newdraft.md发送到post中。
3. page
如果你想另起一页,那么可以使用
hexo new page newpage系统会自动给你在source文件夹下创建一个newpage文件夹,以及newpage文件夹中的index.md,这样你访问的newpage对应的链接就是http://xxx.xxx/newpage
4. 相关命令
hexo clean(清除生成文件)
hexo g(生成网页)
hexo s(本地预览)
hexo d(部署)
hexo clean
hexo generate
hexo deploy
hexo server
图片相关
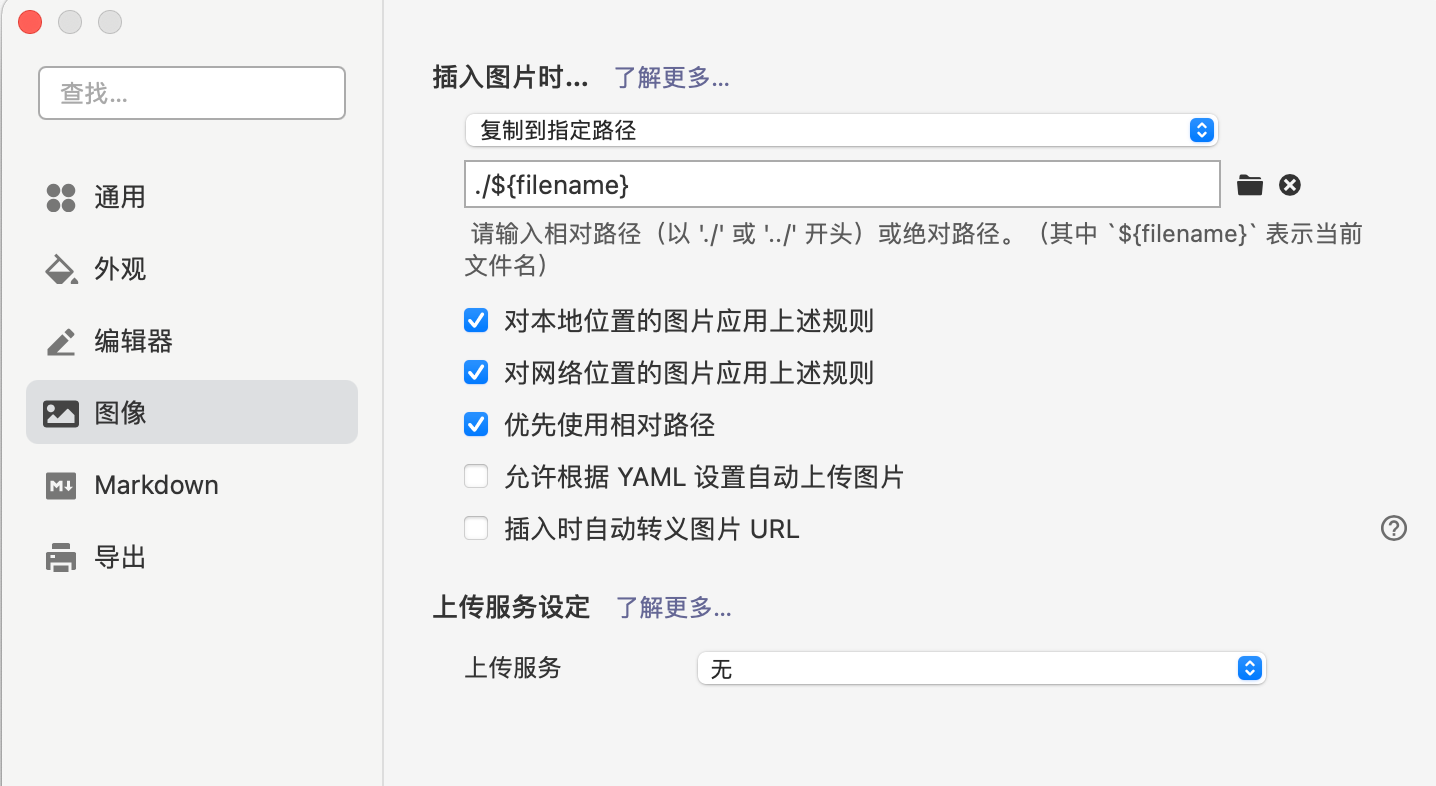
typora配置如下

{% asset_path slug %}
{% asset_img slug [title] %}
{% asset_link slug [title] %}

例子:
{% asset_img 1.png This is an test image %}
比如说:当你打开文章资源文件夹功能后,你把一个 example.jpg 图片放在了你的资源文件夹中,如果通过使用相对路径的常规 markdown 语法 ,它将 不会 出现在首页上。(但是它会在文章中按你期待的方式工作)
正确的引用图片方式是使用下列的标签插件而不是 markdown :
通过例子这种方式,图片将会同时出现在文章和主页以及归档页中。
2.安装插件
npm install https://github.com/CodeFalling/hexo-asset-image -- save
引用图片,利用标签引用
1. {% asset_path slug %}
2. {% asset_img slug [title] %}
3. {% asset_link slug [title] %}
利用makdown


解决代码bug
如果之前不好使
1. npm install https://github.com/CodeFalling/hexo-asset-image --save
2. 打开/node_modules/hexo-asset-image/index.js,将内容更换为下面的代码
'use strict';
var cheerio = require('cheerio');

// http://stackoverflow.com/questions/14480345/how-to-get-the-nth-occurrence-in-a-string
function getPosition(str, m, i) {
  return str.split(m, i).join(m).length;
}

hexo.extend.filter.register('after_post_render', function(data){
  var config = hexo.config;
  if(config.post_asset_folder){
    var link = data.permalink;
    var beginPos = getPosition(link, '/', 3) + 1;
    var appendLink = '';
    // In hexo 3.1.1, the permalink of "about" page is like ".../about/index.html".
    // if not with index.html endpos = link.lastIndexOf('.') + 1 support hexo-abbrlink
    if(/.*\/index\.html$/.test(link)) {
      // when permalink is end with index.html, for example 2019/02/20/xxtitle/index.html
      // image in xxtitle/ will go to xxtitle/index/
      appendLink = 'index/';
      var endPos = link.lastIndexOf('/');
    }
    else {
      var endPos = link.length-1;
    }
    link = link.substring(beginPos, endPos) + '/' + appendLink;

    //console.info&&console.info("------->link:-->"+link);

    var toprocess = ['excerpt', 'more', 'content'];
    for(var i = 0; i < toprocess.length; i++){
      var key = toprocess[i];

      var $ = cheerio.load(data[key], {
        ignoreWhitespace: false,
        xmlMode: false,
        lowerCaseTags: false,
        decodeEntities: false
      });

      $('img').each(function(){
        if ($(this).attr('src')){
          // For windows style path, we replace '\' to '/'.
          var src = $(this).attr('src').replace('\\', '/');

          //console.info&&console.info("111111----src:-->"+src);

          if(!(/http[s]*.*|\/\/.*/.test(src)
            || /^\s+\//.test(src)
            || /^\s*\/uploads|images\//.test(src))) {
            // For "about" page, the first part of "src" can't be removed.
            // In addition, to support multi-level local directory.
            var linkArray = link.split('/').filter(function(elem){
              return elem != '';
            });
            var srcArray = src.split('/').filter(function(elem){
              return elem != '' && elem != '.';
            });

           // console.info&&console.info("111111----srcArray:-->"+srcArray);

            if(srcArray.length > 1)
            srcArray.shift();

           // console.info&&console.info("222222----srcArray:-->"+srcArray);

            src = srcArray[srcArray.length-1];

            // console.info&&console.info("config.root:-->"+config.root);

            // console.info&&console.info("link:-->"+link);

            // console.info&&console.info("src:-->"+src);

            $(this).attr('src', config.root + link + src);
            console.info&&console.info("update link as:-->"+config.root + link + src);
          }
        }else{
          console.info&&console.info("no src attr, skipped...");
          console.info&&console.info($(this));
        }
      });
      data[key] = $.html();
    }
  }
});
参考
https://blog.csdn.net/xjm850552586/article/details/84101345
https://segmentfault.com/q/1010000019625231
文章 Front-matter 介绍
Front-matter 选项详解
Front-matter 选项中的所有内容均为非必填的。但我仍然建议至少填写 title 和 date 的值。
| 配置选项 | 默认值 | 描述 |
|---|---|---|
| title | Markdown 的文件标题 |
文章标题,强烈建议填写此选项 |
| date | 文件创建时的日期时间 | 发布时间,强烈建议填写此选项,且最好保证全局唯一 |
| author | 根 _config.yml 中的 author |
文章作者 |
| img | featureImages 中的某个值 |
文章特征图,推荐使用图床(腾讯云、七牛云、又拍云等)来做图片的路径.如: http://xxx.com/xxx.jpg |
| top | true |
推荐文章(文章是否置顶),如果 top 值为 true,则会作为首页推荐文章 |
| cover | false |
v1.0.2版本新增,表示该文章是否需要加入到首页轮播封面中 |
| coverImg | 无 | v1.0.2版本新增,表示该文章在首页轮播封面需要显示的图片路径,如果没有,则默认使用文章的特色图片 |
| password | 无 | 文章阅读密码,如果要对文章设置阅读验证密码的话,就可以设置 password 的值,该值必须是用 SHA256 加密后的密码,防止被他人识破。前提是在主题的 config.yml 中激活了 verifyPassword 选项 |
| toc | true |
是否开启 TOC,可以针对某篇文章单独关闭 TOC 的功能。前提是在主题的 config.yml 中激活了 toc 选项 |
| mathjax | false |
是否开启数学公式支持 ,本文章是否开启 mathjax,且需要在主题的 _config.yml 文件中也需要开启才行 |
| summary | 无 | 文章摘要,自定义的文章摘要内容,如果这个属性有值,文章卡片摘要就显示这段文字,否则程序会自动截取文章的部分内容作为摘要 |
| categories | 无 | 文章分类,本主题的分类表示宏观上大的分类,只建议一篇文章一个分类 |
| tags | 无 | 文章标签,一篇文章可以多个标签 |
注意:
示例
---
title: typora-vue-theme主题介绍
date: 2020-04-24 09:25:00
author: wish
img: /source/images/xxx.jpg
top: true
cover: true
coverImg: /images/1.jpg
password: 8d969eef6ecad3c29a3a629280e686cf0c3f5d5a86aff3ca12020c923adc6c92
toc: false
mathjax: false
summary: 这是你自定义的文章摘要内容,如果这个属性有值,文章卡片摘要就显示这段文字,否则程序会自动截取文章的部分内容作为摘要
categories: Markdown
tags:
  - Typora
  - Markdown
---
让目录全部展开
参考如下
http://tscanlin.github.io/tocbot/
第一步,更新依赖
npm install --save tocbot
第二步,修改主题配置(_config.yml),collapseDepth大于等于6就可以了

toc:
  enable: true
  heading: h1, h2, h3, h4, h5, h6
  collapseDepth: 6 # 目录默认展开层级
  showToggleBtn: true # 是否显示切换TOC目录展开收缩的按钮
  # If true, all level of TOC in a post will be displayed, rather than the activated part of it.
  expand_all: true
  # Maximum heading depth of generated toc.
  max_depth: 6

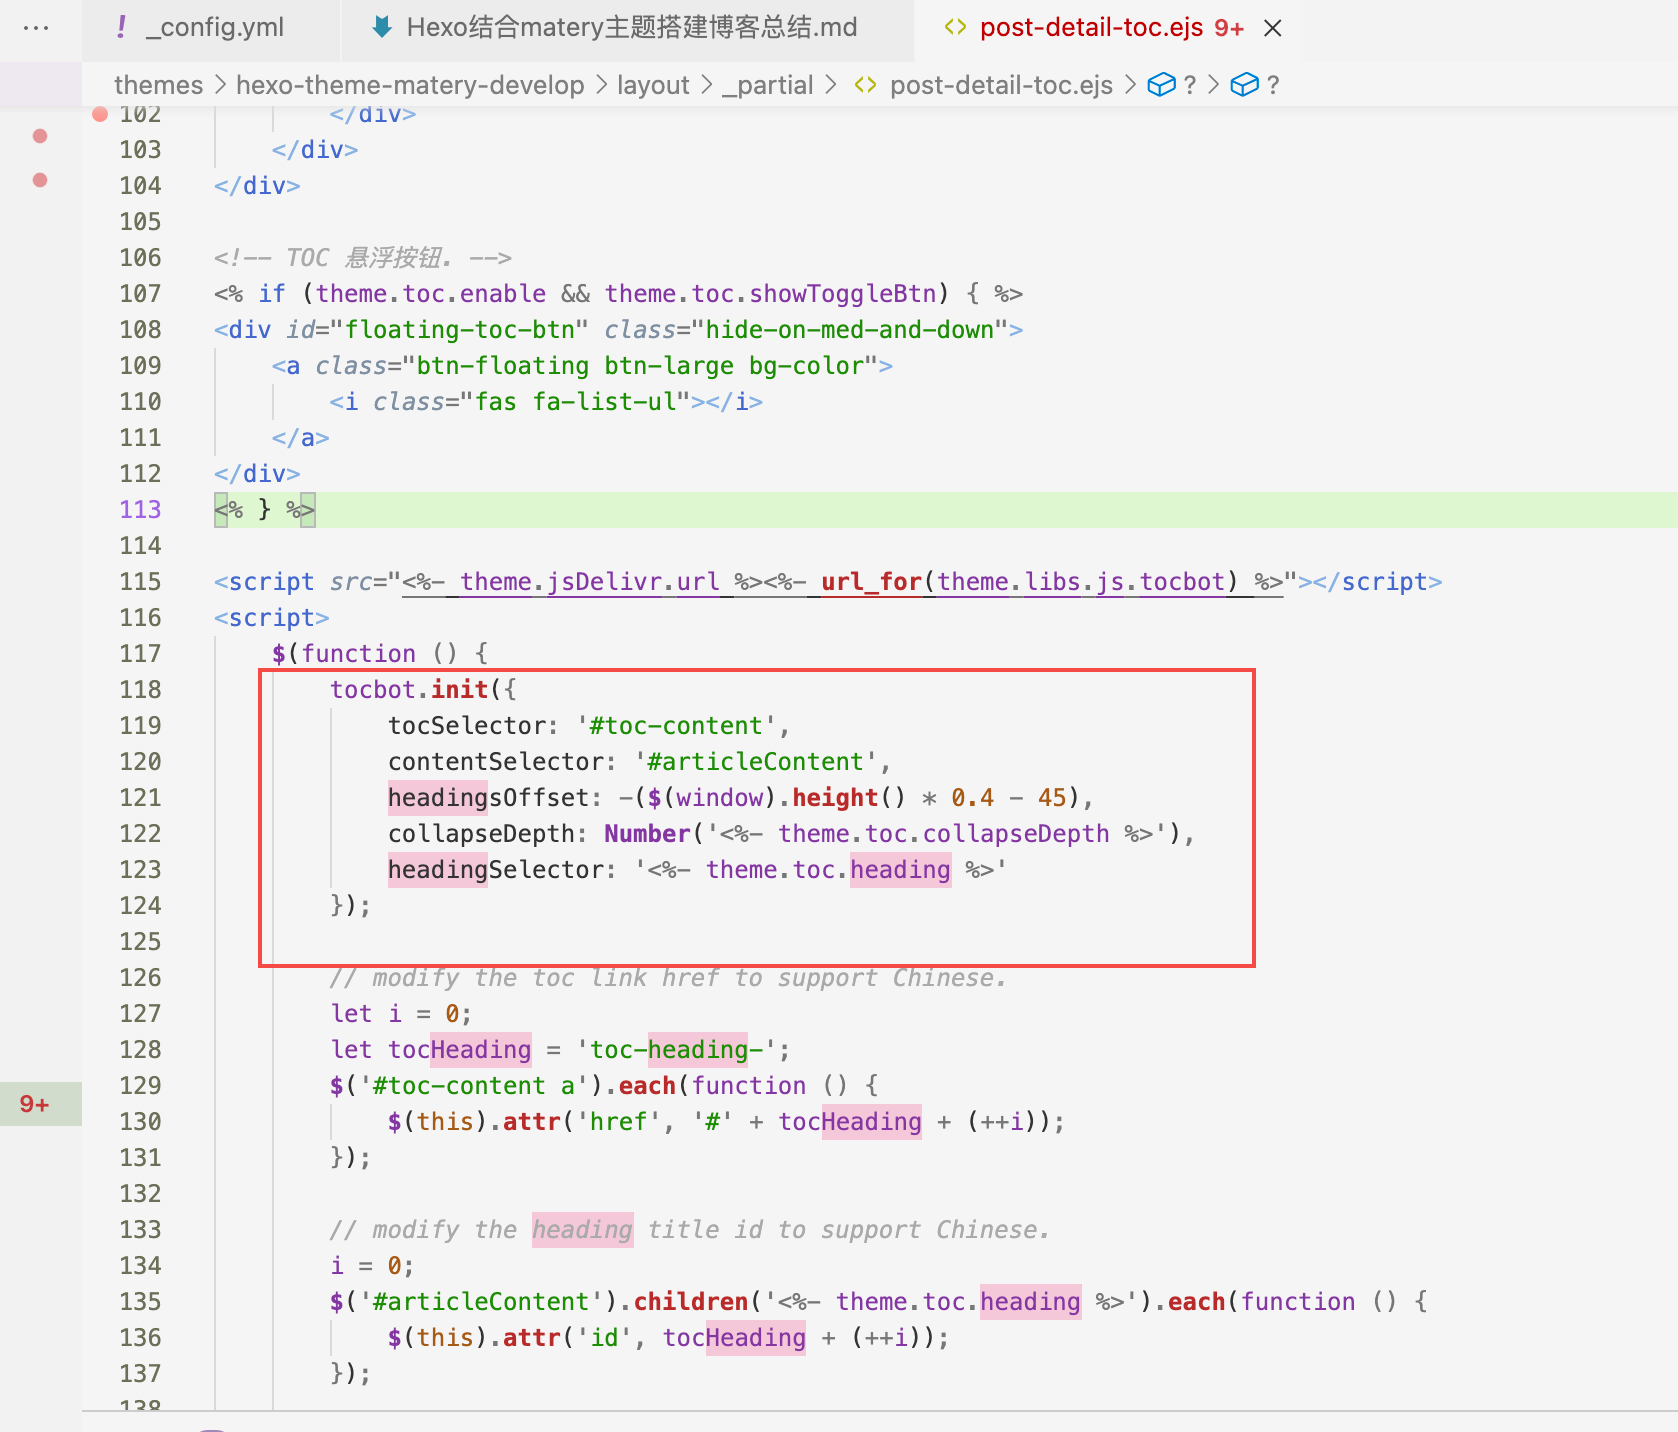
引用位置在MyBlog/themes/hexo-theme-matery-develop/layout/_partial/下的post-detail-toc.ejs文件


